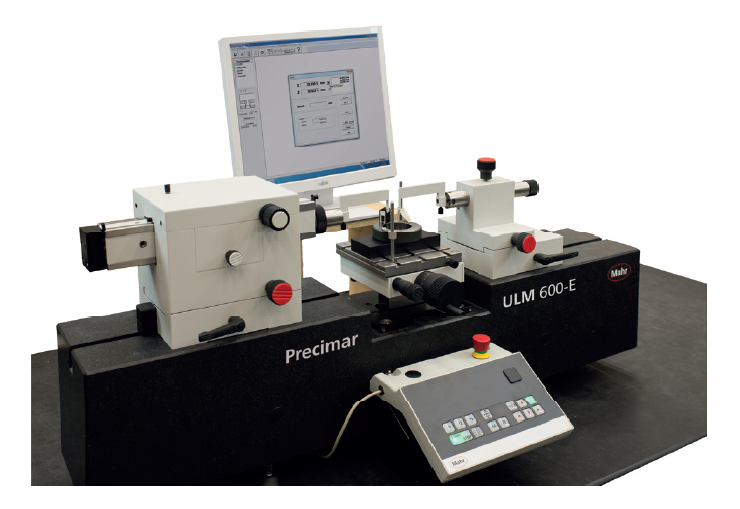
Mahr Precimar ULM Super Micrometer

What is a Mahr Precimar ULM super micrometer?
The Precimar ULM (Universal Length Measuring) family from Mahr are high-precision length measuring/comparator instruments—sometimes called “super micrometers” or length comparators—built for calibration labs and precision machine shops. They combine a rigid, thermally stable granite or granite-based base with high-resolution length encoders (Heidenhain, Renishaw or laser interferometry options), fine-motion spindles or motorized axes, ambient temperature monitoring and software-assisted error correction to deliver extremely low measurement uncertainty.
How is the Precimar ULM different from a standard micrometer or caliper?
Unlike hand micrometers or calipers, the ULM is a bench-style length comparator and measurement platform designed to:
-
hold parts rigidly and repeatably on a thermally stable base,
-
use precision optical/incremental encoders or laser systems for high linear accuracy,
-
apply controlled, reproducible measuring forces (reducing operator influence),
-
integrate temperature sensors and software corrections to minimize systematic error.
Those design choices make it a metrology-grade instrument for calibration, go/no-go setting and traceable dimensional inspection—not just a shop floor sizing tool.
How does a universal length measuring device help CNC machine shops?
Faster, more reliable setup and first-article verification
The ULM lets shops confirm critical dimensions and gage settings quickly and with less rework. Because it gives repeatable, traceable measurements, it reduces the time spent iterating on setup dimensions and speeds time-to-first-good part.
Tighter process control and lower scrap
With lower measurement uncertainty and controlled measuring force, the ULM helps avoid false rejects and missed out-of-tolerance parts. That improves yield and reduces the costs associated with scrap and rework.
Traceability and calibration capability
Many ULM models are designed for calibration work—they can calibrate fixed-limit gauges and generate traceable measurements for quality records (useful for ISO audits and customer requirements). That means shops using a ULM can provide stronger metrology evidence with parts they ship.
Versatility across part sizes and geometries
ULM models come in different lengths and configurations (motorized stages, laser measuring options, inner/outer fixtures), allowing one instrument to inspect shafts, collars, spacers and more—reducing the need to move parts between many different gages.
Reduced operator dependency
Features such as air bearings, defined measuring forces, and software correction minimize the effect of operator technique on results, giving more consistent, reproducible measurements across shifts and operators.
Why do customers prefer a shop that uses a Precimar ULM?
Confidence in critical tolerances
For tight-tolerance components customers expect consistent, documented measurement results. A ULM provides the high precision and traceability needed for critical aerospace, medical, and high-precision industrial parts.
Faster delivery for precision jobs
Because setup and verification are quicker and more reliable, turnaround for precision batches is often shorter. That’s a competitive advantage when tight delivery windows matter.
Audit readiness and documented calibration
If a customer requires calibration certificates or traceable inspection data, parts measured on or verified with a ULM make compliance simpler to demonstrate.
Lower total cost of ownership on tight jobs
The upfront value of fewer rejects, less rework and faster approvals typically outweighs the cost premium of choosing a shop with metrology-grade equipment.
Learn more
If your parts require tight, documented tolerances and you need repeatable, traceable measurement that reduces rework and speeds approval, a shop equipped with a Mahr Precimar ULM offers measurable advantages. These instruments are designed specifically to minimize measurement uncertainty, increase throughput on precision jobs and support calibration traceability—all reasons why customers with demanding specifications choose shops that have them.
Contact us to learn more about our quality assurance equipment and processes.
Industries Served:
Defense • Motorcycle • Hydraulic Components • Agriculture • Aerospace • Heavy Equipment
Locations:
Jefferson, WI Location
211 Collins Road
Jefferson, WI
920-674-6003
Your Solutions
We are...
Proudly American
Basin Precision Machining is proudly American, built on the values of hard work, grit, and a commitment to excellence that this country was founded on. Every component we produce is a testament to American craftsmanship and resilience, and we stand tall knowing that when manufacturers choose to work with us, they’re choosing to keep manufacturing strong right here at home in the USA.
We are...
Working smarter
Our Horizontal Machining Center capacity has been expanded with the addition of a Mazak Palletech Flexible Manufacturing System (FMS). One of the largest in the country, our system offers 6 500MM Horizontal Machining Centers, 120 pallets, and 348 tools per machine. We can now produce any mix of complex parts with zero setup.
We are...
Committed to you
Customer satisfaction is at the heart of everything we do. We work closely with clients to understand their needs, deliver precision parts on time and maintain the highest quality standards. Our dedication to continuous improvement, responsive communication and reliable performance ensures that every project meets, or exceeds, expectations and works toward lasting partnerships grounded in trust and proven results.
© 2025 Basin Industries LLC • Privacy Statement • Terms of Use • Site Design: D2P Web Design
Basin Precision Machining | 211 Collins Road | Jefferson, WI | 920-674-6003
